In order to ensure that your air conditioning system is running efficiently and effectively, it is important to regularly perform maintenance tasks. DIY A/C maintenance can offer numerous benefits, such as cost savings and convenience, but it is essential to understand whether this approach is suitable for your specific system. This article explores the topic of DIY A/C maintenance versus professional maintenance, providing tips and tricks to help you make an informed decision and keep your system running smoothly throughout the year.
Understanding the Basics of Your A/C System
Knowledge about your A/C system parts
To effectively maintain and troubleshoot your A/C system, it is crucial to have a basic understanding of its different parts. These include the compressor, condenser coils, evaporator coils, air filter, thermostat, and air ducts. Familiarize yourself with the location and function of each component to ensure you can identify any potential issues or perform necessary maintenance tasks.
The role and function of different parts
Each part of your A/C system plays a crucial role in the overall cooling process. The compressor, often referred to as the heart of the system, circulates refrigerant and increases its pressure, allowing for efficient cooling. The condenser coils help dissipate heat and convert refrigerant gas back into a liquid state. The evaporator coils absorb heat from the indoor air, cooling it down. The air filter helps remove dust, pollen, and other contaminants, improving indoor air quality. The thermostat regulates the temperature, while the air ducts distribute the conditioned air throughout your home or building.
Understanding the cooling process
The cooling process of an A/C system starts when the thermostat detects that the indoor temperature is higher than the desired set temperature. It sends a signal to the compressor to start working. The compressor then compresses the refrigerant, which raises its temperature and pressure. The hot refrigerant gas flows through the condenser coils, where it releases heat to the outdoor environment and converts back into a liquid state. The liquid refrigerant then travels to the evaporator coils, where it evaporates, absorbing heat from the indoor air and cooling it down. The cool air is then circulated through the air ducts and distributed throughout the space.
Why Regular A/C Maintenance is Crucial
Importance of regular maintenance
Regular maintenance is essential to keep your A/C system running efficiently and reliably. It helps prevent major breakdowns, prolongs the lifespan of your unit, and ensures optimal performance. By addressing small issues and conducting routine inspections, you can identify and resolve problems before they escalate into costly repairs or replacements. Regular maintenance also helps improve indoor air quality by ensuring the air filter is clean and functioning properly.
Impacts on energy efficiency
One of the key benefits of regular A/C maintenance is improved energy efficiency. When your system is well-maintained, it operates more effectively, reducing energy consumption and lowering your utility bills. Dirty filters, clogged coils, and other neglected components can cause your system to work harder to achieve the desired temperature, leading to increased energy usage. By regularly cleaning and maintaining your A/C system, you can optimize its efficiency and save on energy costs.
Effects on system longevity
Proper maintenance significantly extends the lifespan of your A/C system. Neglected units are more prone to wear and tear, which can result in premature failure and the need for costly replacements. By regularly inspecting, cleaning, and servicing your A/C system, you can identify and address potential issues early on. This proactive approach helps ensure that your system functions optimally and remains reliable for many years to come.

This image is property of aaaheatingandcoolinginc.com.
Signs That Your Air Conditioner Needs Maintenance
Identifying unusual noises
Unusual noises coming from your air conditioner are often a telltale sign that maintenance is needed. Squealing, grinding, or banging sounds may indicate loose or damaged components, worn-out belts, or motor issues. These noises should not be ignored, as they can worsen over time and potentially lead to more significant damage. If you notice any unusual sounds, it is important to promptly investigate and address the issue to prevent further damage and ensure proper system functionality.
Recognizing improper cooling
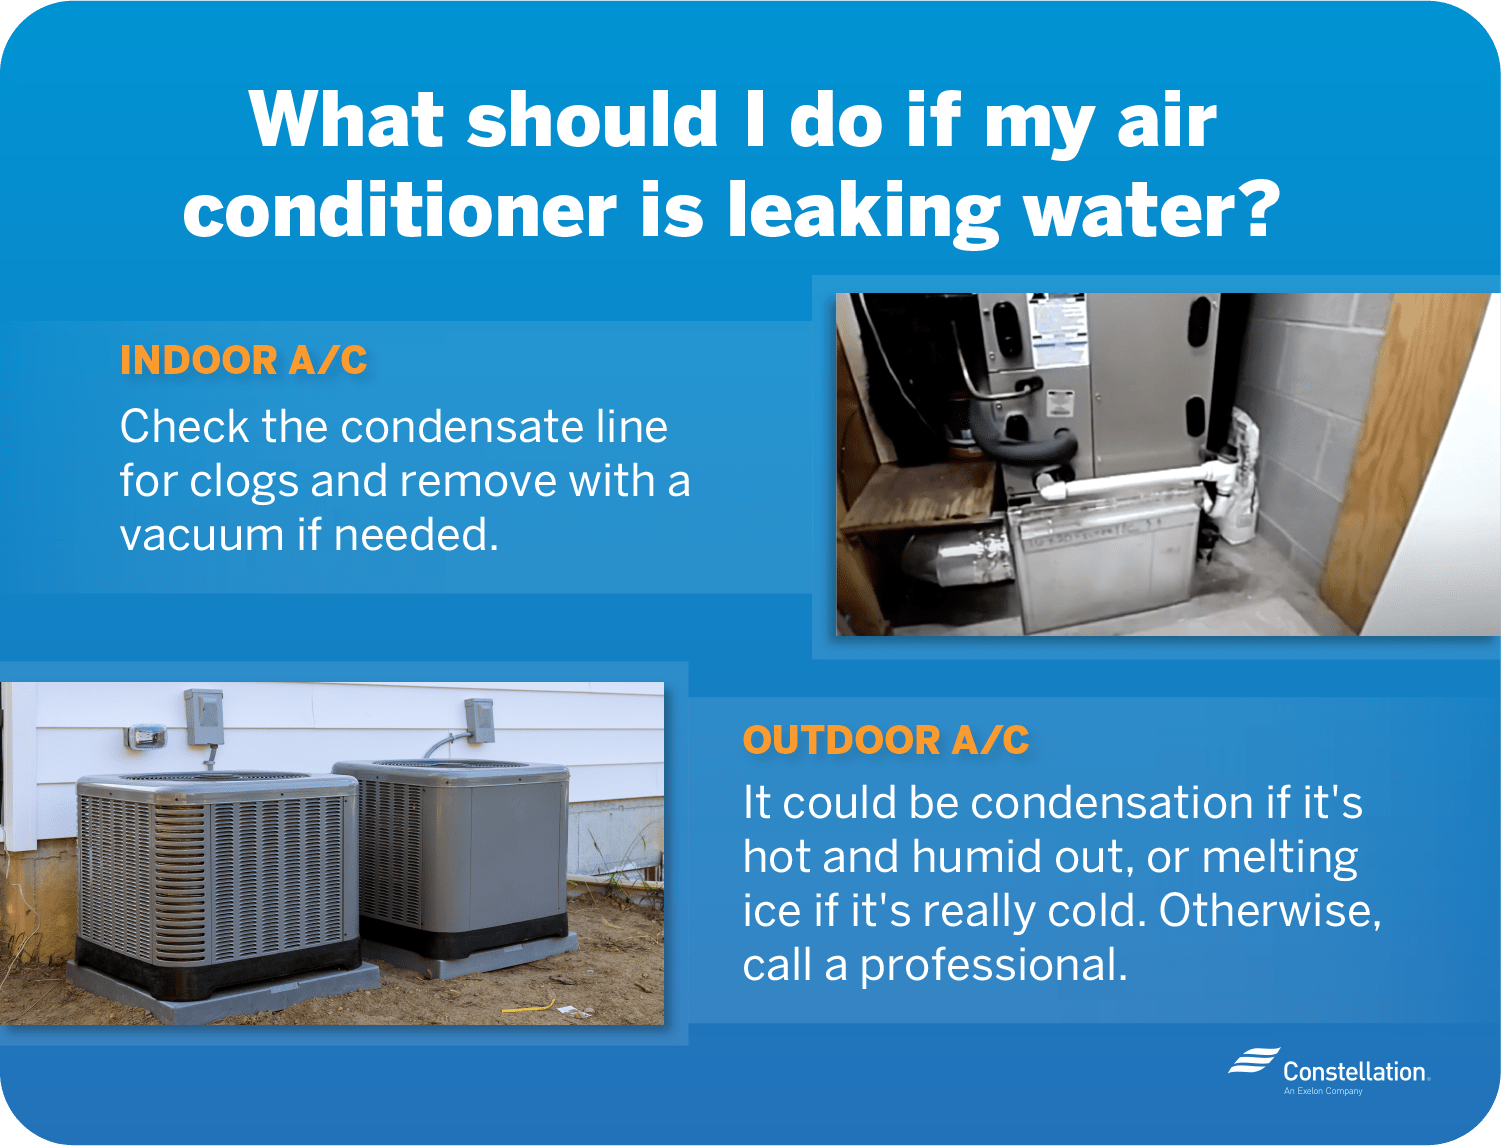
If you notice that your A/C system is no longer cooling your space as effectively as it used to, it may be a sign that maintenance is required. Inadequate cooling can be caused by a variety of factors, such as dirty air filters, clogged coils, refrigerant leaks, or malfunctioning components. Regular maintenance, including cleaning and inspecting these components, can help identify and rectify the underlying issues, allowing your system to cool your space efficiently once again.
Noticing a sudden increase in electric bills
If you observe a sudden spike in your electric bills without any significant lifestyle changes, your A/C system may be in need of maintenance. Poorly maintained systems are often less energy-efficient, resulting in increased energy consumption and higher utility bills. By addressing maintenance-related issues, such as dirty coils or a malfunctioning thermostat, you can restore your system’s efficiency and prevent unnecessary energy waste.
Replacing Your Air Filter
The importance of replacing the air filter
Regularly replacing your air filter is essential for maintaining good indoor air quality and optimizing your A/C system’s performance. The air filter helps trap dust, pollen, pet dander, and other airborne particles, preventing them from circulating in your home. Over time, the filter becomes clogged, reducing airflow and forcing your system to work harder. This can lead to decreased cooling efficiency, increased energy usage, and potentially, damage to the system. Replacing the air filter at recommended intervals ensures proper airflow, improves indoor air quality, and preserves the longevity of your A/C system.
Identifying when to replace your air filter
The frequency at which you should replace your air filter depends on various factors, including the type of filter, the presence of pets or smokers in your home, and the air quality in your area. As a general guideline, disposable fiberglass filters typically require replacement every 30 days, while pleated filters with higher MERV ratings can last up to three months. However, it is important to monitor the condition of your filter regularly and replace it if it appears dirty or clogged. Additionally, filters in heavily used areas or homes with pets may require more frequent replacement.
Steps to replace your air filter
Replacing your air filter is a relatively simple process. Start by locating the air filter compartment, typically found near the return air duct or the air handler unit. Turn off your A/C system to prevent it from circulating dust while the filter is removed. Open the compartment and remove the existing filter, taking note of its size and orientation. Insert the new filter, ensuring it is properly aligned with the arrows on the frame indicating the direction of airflow. Close the compartment and turn your system back on. Regularly checking and replacing your air filter will help maintain optimal A/C system performance.

This image is property of blog.constellation.com.
Cleaning and Inspecting the Condenser Coils
Understanding the role of condenser coils
The condenser coils in your A/C system play a crucial role in releasing heat from the refrigerant gas to the outdoor environment. Over time, these coils can become dirty or covered in debris, hindering heat transfer and reducing the system’s cooling efficiency. Regular cleaning and inspection of the condenser coils are essential to ensure optimal heat dissipation and prevent potential issues.
How to clean condenser coils properly
Cleaning the condenser coils is a task that requires care and attention. Start by turning off the power to your A/C system to prevent accidents. Remove any debris, leaves, or vegetation that may have accumulated around the outdoor unit. Use a soft brush or a vacuum cleaner with a brush attachment to gently clean the exterior of the coils, removing any dust or dirt. It is important not to use a pressure washer or direct water spray on the coils, as this can cause damage. If the coils are heavily soiled, it may be necessary to use a coil cleaner specifically designed for A/C systems. Follow the manufacturer’s instructions carefully and rinse off the cleaner thoroughly. Once the coils are clean, allow them to dry completely before turning the power back on.
Signs your condenser coils may need inspection
Regular inspection of the condenser coils is crucial to detect any potential issues early on. Signs that your condenser coils may need inspection include reduced cooling efficiency, unexplained increases in energy consumption, or sudden malfunctions of the A/C system. Additionally, if you notice an accumulation of ice or frost on the coils, it may indicate a problem with the refrigerant levels or airflow. If you observe any of these signs, it is recommended to schedule a professional inspection to assess the condition of your condenser coils.
Checking and Cleaning the Evaporator Coils
Knowing the job of evaporator coils
The evaporator coils in your A/C system are responsible for absorbing heat from the indoor air, cooling it down, and dehumidifying it. Over time, these coils can become dirty or covered in debris, reducing their efficiency and impeding the cooling process. Regular cleaning and maintenance of the evaporator coils are essential to ensure efficient operation and prevent potential issues.
Steps to clean your evaporator coils
Cleaning the evaporator coils requires a cautious approach. Start by turning off the power to your A/C system to avoid any accidents. Access the evaporator coil by removing the panel on the air handler unit. Carefully inspect the coils for any visible dirt, dust, or debris. If necessary, use a soft brush or a vacuum cleaner with a brush attachment to gently remove the accumulation. Be careful not to bend or damage the fins on the coils. If the coils are significantly soiled, it may be beneficial to use a specialized evaporator coil cleaner. Follow the manufacturer’s instructions and rinse off the cleaner thoroughly. Once the coils are clean, allow them to dry completely before reassembling the panel and turning the power back on.
When to get professional help for evaporator coils
While regular cleaning and maintenance of the evaporator coils can often be performed as a DIY task, certain situations may require professional assistance. If you are not confident in your ability to safely access and clean the coils, it is recommended to seek the help of a licensed HVAC technician. Additionally, if you encounter any issues during the cleaning process, such as damaged fins or refrigerant leaks, it is important to contact a professional for further diagnosis and repair.

This image is property of happyhiller.com.
Assessing and Sealing Leaky Air Ducts
How to spot leaky air ducts
Leaky air ducts can significantly impact the efficiency and performance of your A/C system. Common signs of leaky air ducts include uneven cooling or hot spots in your space, excessive dust accumulation, and high utility bills. Additionally, if you notice whistling or hissing sounds near the air ducts, it may indicate air leakage. Conduct a visual inspection of your air ducts, paying attention to any visible gaps, disconnected or loose ducts, or damaged seals. If you suspect leaky air ducts, it is important to address the issue to optimize energy efficiency and indoor comfort.
Effective DIY tips for sealing air leaks
Sealing air leaks in your air ducts can often be accomplished through simple DIY techniques. Start by inspecting the seams, connections, and joints of your air ducts. Use foil tape or mastic sealant to seal any visible gaps or loose connections. Ensure that all connections are properly secured and sealed. Additionally, consider insulating your air ducts to prevent heat transfer and further improve energy efficiency. However, it is important to note that DIY air duct sealing may not be suitable for all situations. If your air ducts are inaccessible or if you are unsure about your ability to effectively seal the leaks, it is recommended to consult a professional HVAC technician.
When to call professionals for air duct sealing
While DIY air duct sealing can be effective in many cases, there are situations that require the expertise of a professional. If your air ducts are located in hard-to-reach areas, such as crawl spaces or attics, or if you are facing extensive ductwork repairs, it is advisable to seek professional assistance. HVAC technicians have the tools and knowledge to properly diagnose and repair the leaks, ensuring optimal system performance and energy efficiency.
Adjusting and Testing the Thermostat
The role of the thermostat in A/C efficiency
The thermostat is the control center of your A/C system, regulating the temperature and ensuring optimal comfort and energy efficiency. Adjusting and testing the thermostat is essential to maintain an accurate and consistent temperature in your space, enhance system performance, and reduce energy waste.
Troubleshooting common thermostat problems
If you encounter any issues with your thermostat, there are several troubleshooting steps you can take before seeking professional help. Start by checking the power source and ensuring that the thermostat is properly connected. If the display is not functioning or the buttons are unresponsive, replace the batteries or reset the thermostat according to the manufacturer’s instructions. Verify that the thermostat is set to the correct mode (cooling), and that the desired temperature is properly programmed. If these steps do not resolve the issue, it may be necessary to consult a professional HVAC technician to assess and repair the thermostat.
How to adjust your thermostat for optimal performance
Adjusting the thermostat settings properly can greatly enhance the efficiency of your A/C system. Consider setting your thermostat to the highest comfortable temperature during the summer months to reduce energy consumption. Utilize programmable or smart thermostats to automatically adjust temperature settings based on your schedule. This allows for energy savings when you are away from home or during nighttime hours. Avoid frequently adjusting the temperature settings, as this can lead to increased energy usage. Instead, aim for a consistent and moderate temperature that provides comfort without unnecessarily straining your system.

This image is property of blog.constellation.com.
Clearing Debris Around The Outdoor Unit
Why cleanliness around the outdoor unit matters
Maintaining a clean and debris-free environment around the outdoor unit of your A/C system is essential for optimal performance and longevity. Accumulation of leaves, grass, dirt, and other debris can obstruct airflow, impede heat dissipation, and strain your system. By regularly clearing the area around the outdoor unit, you can ensure unrestricted airflow, enhance cooling efficiency, and reduce the risk of breakdowns or malfunctions.
Steps to clear debris near A/C unit
Clearing debris around the outdoor unit is a relatively simple task that can be performed as part of your regular maintenance routine. Start by turning off the power to your A/C system to prevent accidents. Remove any visible debris, such as leaves or branches, from the top and sides of the unit using a soft brush or gloved hands. Be cautious not to damage any delicate components or fins. Use a vacuum cleaner with a brush attachment to gently clean the fins, removing any dirt or dust. If the fins are heavily clogged, it may be necessary to use a fin comb to straighten and restore their proper spacing. Finally, trim any nearby vegetation or foliage to ensure adequate airflow around the unit.
Frequency of cleaning for optimal system function
The frequency of cleaning the area around the outdoor unit depends on various factors, including the environment in which your A/C system is located and the amount of debris present. As a general guideline, it is recommended to check and clean the area at least twice a year: once before the cooling season begins and once again after it ends. Additionally, perform visual inspections regularly and promptly remove any debris that may have accumulated in the interim. By adopting a proactive approach to outdoor unit maintenance, you can ensure optimal system function and prolong the lifespan of your A/C system.
DIY A/C Maintenance vs. Professional Maintenance: What’s Best for Your System?
Balancing between DIY and professional maintenance
Maintaining your A/C system involves a combination of do-it-yourself tasks and professional maintenance. While there are several maintenance tasks that you can perform on your own, such as replacing air filters and clearing debris, there are other aspects of maintenance that require the expertise and experience of a professional HVAC technician. Striking the right balance between DIY and professional maintenance ensures that your system remains in peak condition and that potential issues are identified and resolved efficiently.
Situations where professional help is necessary
Certain situations and maintenance tasks necessitate the involvement of a professional. Complex repairs, refrigerant leaks or recharging, electrical troubleshooting, and internal components cleaning or repairs should always be handled by a licensed HVAC technician. Additionally, if you encounter any issues during your own maintenance efforts, it is important to seek professional assistance to avoid further damage or complications. Regular professional maintenance, typically performed annually, also helps identify underlying issues and provides a comprehensive evaluation of your A/C system.
Cost implications of DIY vs professional maintenance
DIY maintenance tasks, such as replacing air filters and clearing debris, can be cost-effective and easily incorporated into your routine. However, it is important to note that neglecting professional maintenance can lead to more significant and costlier repairs down the line. By investing in regular professional maintenance, you can catch potential issues early on, prevent major breakdowns, and ensure the longevity and performance of your A/C system. Consider professional maintenance as an investment in the reliability and efficiency of your system, potentially saving you money in the long run.
In conclusion, understanding the basics of your A/C system is crucial to effectively maintain and troubleshoot it. Regular A/C maintenance is vital for optimal performance, energy efficiency, and system longevity. Being aware of signs that indicate the need for maintenance allows you to address issues promptly. Tasks such as replacing the air filter, cleaning and inspecting the condenser and evaporator coils, assessing and sealing leaky air ducts, testing and adjusting the thermostat, and clearing debris around the outdoor unit, all contribute to a well-maintained A/C system. Finding the right balance between DIY and professional maintenance ensures a comprehensive approach to A/C system care. Ultimately, investing in regular professional maintenance can save you money and enhance the reliability and efficiency of your A/C system.

This image is property of www.airmastersllc.com.